

How to Test for Thread or Fabric Color Bleeding
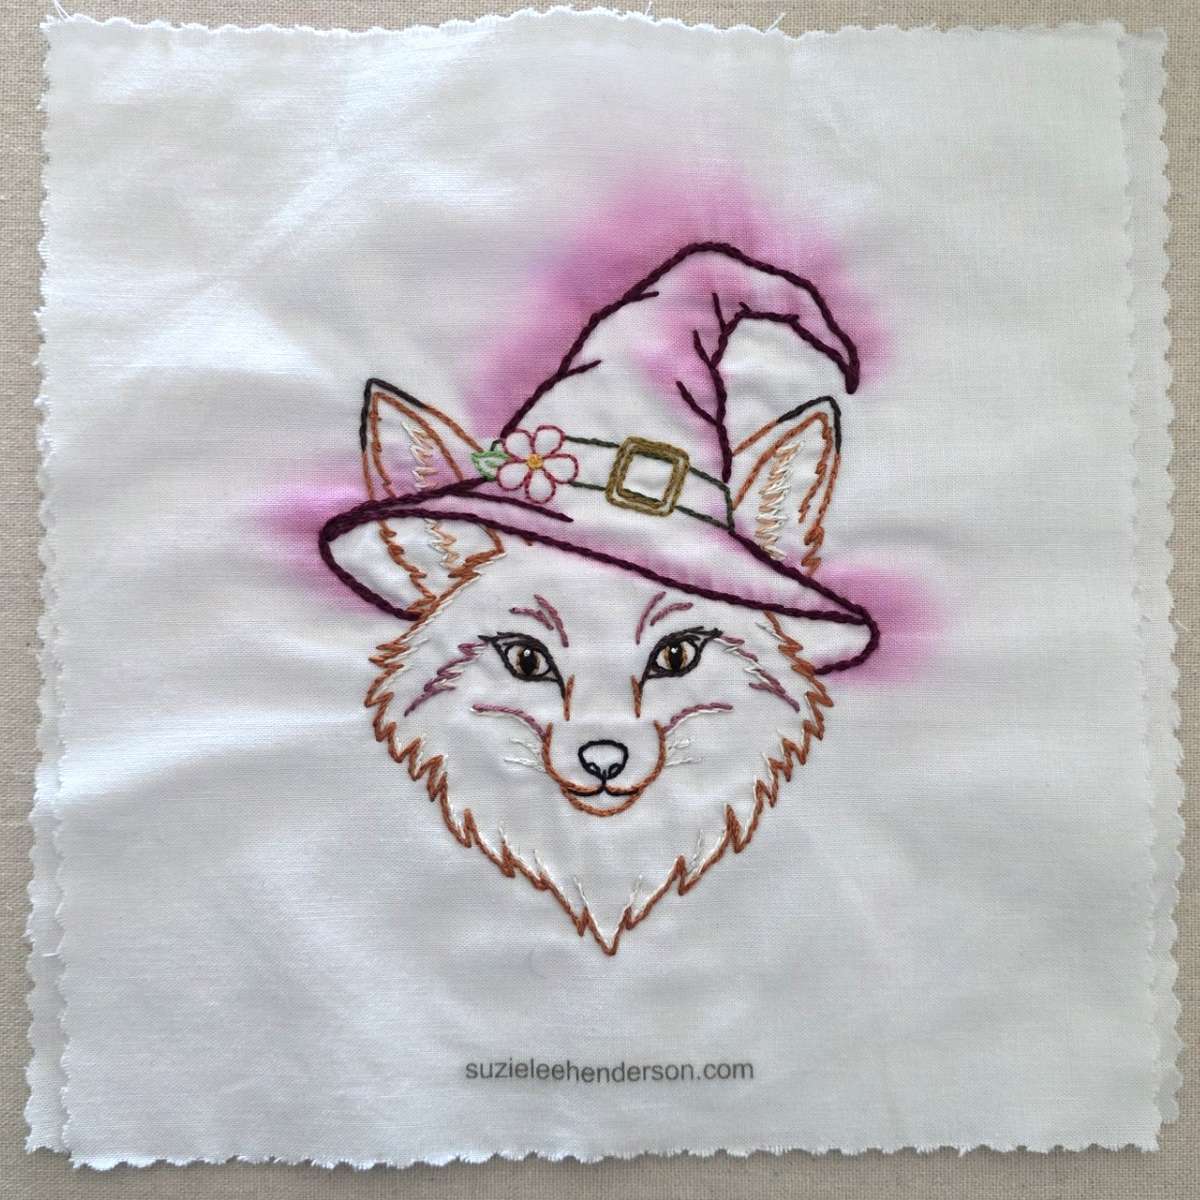
A Few Minutes Can Save Hours of Stitching.
Color bleeding is one of the most frustrating things that can happen to a finished embroidery project. After hours of stitching, you give it a careful wash, then watch in horror as a beautiful red, blue, or purple thread bleeds into the surrounding fabric.
The good news is that a simple colorfastness test can help you catch potential problems before you begin stitching. It only takes a few minutes and can save a finished project from stains that may be difficult, or sometimes impossible, to remove.
I can honestly say I hope I learn from my mistake. I'm always so excited to start a new project that I often skip this step. Especially if I am not using any hand or overdyed threads. In the project shown above, I used a mix of DMC and Anchor floss and didn't even consider doing a colorfast (bleed) test.
Testing thread and fabric is not the most exciting part of starting a new embroidery project, but it is one of those small habits that can prevent a very big disappointment.
A scrap of fabric, a few inches of floss, and several minutes of testing can tell you a lot about how your materials will behave later. When it comes time to wash your finished embroidery, it is much more reassuring to do so knowing that you have already tested the thread and fabric.
I'll explain what colorfast means and how to perform some tests. Then, I'll discuss what I could have done differently to prevent this issue.
The good news is that a simple colorfastness test can help you catch potential problems before you begin stitching. It only takes a few minutes and can save a finished project from stains that may be difficult, or sometimes impossible, to remove.
I can honestly say I hope I learn from my mistake. I'm always so excited to start a new project that I often skip this step. Especially if I am not using any hand or overdyed threads. In the project shown above, I used a mix of DMC and Anchor floss and didn't even consider doing a colorfast (bleed) test.
Testing thread and fabric is not the most exciting part of starting a new embroidery project, but it is one of those small habits that can prevent a very big disappointment.
A scrap of fabric, a few inches of floss, and several minutes of testing can tell you a lot about how your materials will behave later. When it comes time to wash your finished embroidery, it is much more reassuring to do so knowing that you have already tested the thread and fabric.
I'll explain what colorfast means and how to perform some tests. Then, I'll discuss what I could have done differently to prevent this issue.
What Does Colorfast Mean?
When a thread or fabric is colorfast, its dye stays put when it comes into contact with water, moisture, or other conditions that might cause the color to run.
When a dye is not colorfast, some of that color can transfer into the surrounding fabric or thread. This is often called bleeding.
Bleeding can happen with embroidery floss, hand-dyed threads, richly colored fabrics, and even materials you have used successfully before. That is why testing is especially useful when you know the finished embroidery will eventually need to be washed.
When a dye is not colorfast, some of that color can transfer into the surrounding fabric or thread. This is often called bleeding.
Bleeding can happen with embroidery floss, hand-dyed threads, richly colored fabrics, and even materials you have used successfully before. That is why testing is especially useful when you know the finished embroidery will eventually need to be washed.
When Should You Test Your Thread?
You do not necessarily need to test every skein of floss before every project, but there are times when it is especially worthwhile.
Consider testing when you are using:
Consider testing when you are using:
- Dark or highly saturated colors
- Reds, burgundies, purples, deep blues, and other strong shades
- Hand-dyed or overdyed floss
- Unfamiliar thread brands
- Vintage thread - Even older DMC threads are not all colorfast.
- Thread that has been stored for a long time
- A project stitched on very light fabric
- An embroidery piece that will definitely be washed
If you are making something that will become a family keepsake, gift, quilt block, clothing item, or anything else that may need regular washing, testing first gives you a little extra peace of mind.
A Simple Test for Embroidery Thread.
Cut a short piece of the thread you plan to use. You only need a few inches.
- Place the thread in a small container of cool or lukewarm water and let it soak for several minutes.
- Then remove the thread and place it on a clean white paper towel, white cotton fabric, or another absorbent white surface.
- Press it gently.
- Look for any color transferring from the thread.
- You can also inspect the water. If the water has noticeably changed color, the thread may be releasing excess dye.
For an even more realistic test, allow the wet thread to rest against a scrap of the actual fabric you plan to use. Once everything is dry, check the fabric for staining.
In the example shown, the bleeding didn't start right away. After handwashing the piece, I placed it on a bath towel to air-dry. I noticed the bleeding about an hour later.
In the example shown, the bleeding didn't start right away. After handwashing the piece, I placed it on a bath towel to air-dry. I noticed the bleeding about an hour later.
Don't Forget to Test the Fabric.
Thread is not the only material that can bleed. Fabric can also release dye.
This is particularly important with dark fabrics, brightly colored cottons, hand-dyed fabrics, and fabrics that have not been prewashed.
This is particularly important with dark fabrics, brightly colored cottons, hand-dyed fabrics, and fabrics that have not been prewashed.
- Cut a small piece of the fabric and soak it in cool water.
- Place it on a white towel or piece of white cotton and press gently.
- If you notice dye transferring to the white material, your fabric may not be completely colorfast.
You can also rinse the fabric several times and watch the water to see whether color continues to come out.
Test the Entire Color Combination.
When possible, do not test just one color. If your embroidery design uses several strong colors, make a tiny sample using all of them.
Stitch a few lines on a scrap of your project fabric using the same threads you plan to use in the finished design.
Then wash the sample exactly as you would the finished embroidery.
This is one of the best tests because it recreates the conditions of the actual project. This is especially true if you don't prewash your fabrics. It's not common, but sometimes sizing or chemicals left in the fabric during manufacturing can react with different dyes.
You will also learn something else useful, like how the fabric and stitching behave after washing. If your fabric shrinks a lot, you could get puckers under your stitches.
Stitch a few lines on a scrap of your project fabric using the same threads you plan to use in the finished design.
Then wash the sample exactly as you would the finished embroidery.
This is one of the best tests because it recreates the conditions of the actual project. This is especially true if you don't prewash your fabrics. It's not common, but sometimes sizing or chemicals left in the fabric during manufacturing can react with different dyes.
You will also learn something else useful, like how the fabric and stitching behave after washing. If your fabric shrinks a lot, you could get puckers under your stitches.
What If the Thread or Fabric Bleeds?
A little color in the water does not always mean you cannot use the material, but it does mean you should be cautious.
Depending on the project, you may decide to:
Depending on the project, you may decide to:
- Choose a different thread or fabric
- Avoid washing the finished embroidery
- Prewash the fabric before stitching
- Rinse excess dye from the thread before using it
- Make a complete stitched test sample before committing to the final piece
If the thread continues releasing a significant amount of dye after several rinses, I would be hesitant to use it on white or very light fabric. If you do use it, just know that you probably can't ever wash it.
Be Careful With Fix-It Tricks.
You may have heard suggestions such as adding vinegar or salt to the water to “set” the dye. Unfortunately, there is no single home remedy that reliably fixes every type of dye or fiber. Different dyes are set using different processes, and something that works for one material may do nothing for another. As someone who has dyed her own floss and fabric, I can tell you the home remedies haven't worked for me.
I have also heard of people using the dye-catcher laundry sheets to prevent bleeding. I've never tried this, and from what I've gathered, it's not a foolproof option either. If you want to try this method, I would do a few test pieces first.
For embroidery, the safest approach is usually prevention: test your materials first and avoid using anything that behaves unpredictably.
I have also heard of people using the dye-catcher laundry sheets to prevent bleeding. I've never tried this, and from what I've gathered, it's not a foolproof option either. If you want to try this method, I would do a few test pieces first.
For embroidery, the safest approach is usually prevention: test your materials first and avoid using anything that behaves unpredictably.
Test Using the Same Conditions as the Finished Project
This is probably the most important part of colorfastness testing.
- If you plan to wash your finished embroidery in warm water, test it in warm water.
- If the finished piece will be put in a washing machine, test your sample in the washing machine.
- If you plan to use a particular detergent, include it in your test.
The closer your test is to the real washing conditions, the more useful the results will be.


